
| The information in this article applies to customers on DocSend Standard, Advanced, Advanced Data Rooms and Enterprise. |
In this article, we’ll walk you through how to set up the DocSend Salesforce integration. You’ll enable Salesforce sync in DocSend, create custom fields in Salesforce, and then map them accordingly in DocSend to get the most value out of the integration. Make sure your Salesforce and DocSend accounts are connected first.
Enable Salesforce sync in DocSend
If you’re an account owner or admin, you can enable Salesforce sync from the Company Salesforce Settings page.
From here, you can choose to enable any of the following DocSend data:
- Visits: These occur when a visitor opens a DocSend link
- Document link creations: These occur when a user creates a new document link
- Space link creations: These occur when a user creates a new Space link
To enable these sync types, go to the related tab and select Sync visits, link creations, Space link creations.
Additional sync settings
You can also enable a few more settings to further enhance the integration. These settings are optional, and you should consider your organization’s overall Salesforce workflows before enabling any of them.
Visits:
- Create new Leads for unmatching emails: Creates a Lead to sync a visit to if a visitor’s email isn’t found in Salesforce.
- Create open Tasks for unmatching records: Creates an open Task in Salesforce if a visitor’s email isn’t found in Salesforce.
Links and Spaces:
- Create open Tasks for unlinked Accounts: Creates an open Task in Salesforce if the related account isn’t found in Salesforce.
Add “task type” picklist values in Salesforce
The next few setup steps will occur in Salesforce and require admin access to complete. First up is adding new picklist values to the task. Type field; these will be applied to the tasks that DocSend syncs to Salesforce.
-
Click Setup in the top right-hand corner.
2. Search for and open “Object Manager”.
- Search for “Task” in the quick find search field.
- Select Fields and Relationships in the left navigation.
- Select the type field.
- Under Task type picklist values, click New and add the following values:
- DocSend visit
- DocSend link creation
- DocSend Space creation
Create custom fields in Salesforce
Next, you’ll create new custom fields on the Activity object in Salesforce. Adding custom fields is helpful because the DocSend data will sync to specific fields, and will enable you to easily see the metadata and use it for Salesforce reports.
This section will guide you through how to add a new custom field in Salesforce. Then, in each subsection below, you’ll find a list of fields to create for each sync type.
To add a custom field on the Activity object:
- Open Object manager and find the Activity object.
- Select Fields and relationships in the left navigation.
-
Click New to create a new field.
- Select the appropriate data type for the field; these are listed in the tables below.
- Input the recommended field name as the field label and configure the field settings.
- Text fields should have a length of 255 characters.
- Number fields should have a length of 18 digits and 0 decimal places.
-
Set the field-level security to Visible for all.
- Add the field to the task layout and click Save (or Save & New to continue creating fields).
- Repeat these steps to create all the fields listed in the sections below.
| Note: If you decide not to enable a particular sync type, you don’t need to create the custom fields for that sync type. In other words, if you don’t want to sync Space link creations, you can skip that section. |
Custom fields for visits
The fields below are recommended for syncing visits to Salesforce. The first two columns outline the recommended name and data type to configure in Salesforce, and the last column denotes the related DocSend field.
| Note: You can configure different names for the Salesforce fields above, but we recommend keeping them aligned to the related DocSend field to avoid any confusion. |
Custom fields for document link creations
The fields below are recommended for syncing link creations to Salesforce. The first two columns outline the recommended name and data type to configure in Salesforce, and the last column denotes the related DocSend field.
| Important: The red fields below are also used for syncing link creation data. If you already created these fields, you don’t need to recreate them. |
Custom fields for Space link creations
The fields below are recommended for syncing Space link creations to Salesforce. The first two columns outline the recommended name and data type to configure in Salesforce, and the last column denotes the related DocSend field. 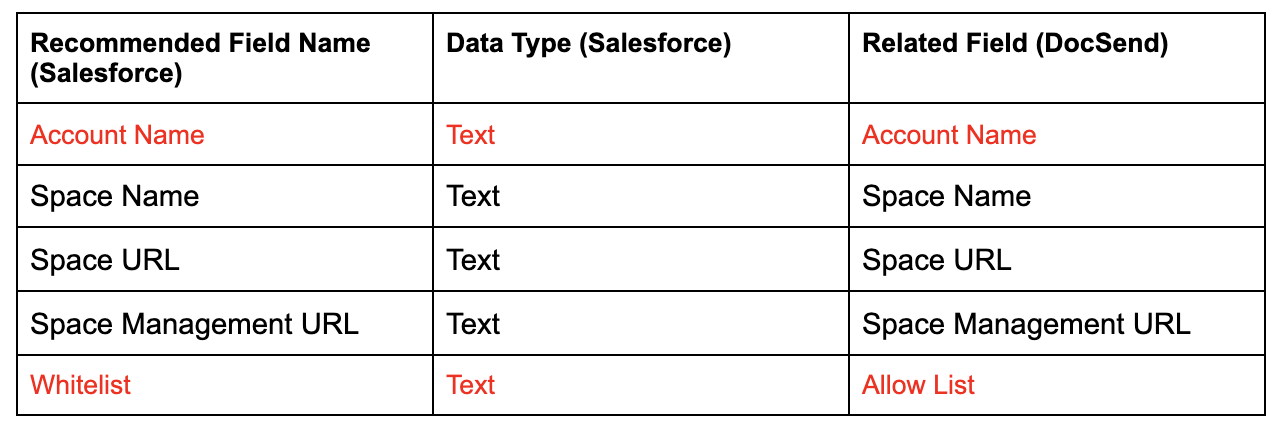
Map salesforce fields in DocSend
After you’ve added the picklist types and created your custom fields in Salesforce, it’s time to you can map them in DocSend.
| Note: If you decide not to enable a particular sync type, you don’t need to map any fields for that sync type. In other words, if you don’t want to sync Space link creations, you can skip that section. |
Field mapping for visits
-
Under Value, type “DocSend visit” and click Add to confirm.
-
Then, under Field Mappings, set the Visit Property field equal to the appropriate Activity Field (from Salesforce), click Add, and repeat this for all custom fields:
| Note: If you used different names for your custom fields in Salesforce, the options in Activity fields may look different. Select whichever field name(s) you configured in Salesforce. |
Field mapping for document link creations
-
Under Value, type “DocSend link creation” and click Add to confirm.
-
Then, under Field Mappings, set the Visit Property field equal to the appropriate Activity Field (from Salesforce), click Add, and repeat this for all custom fields:
Field mapping for Space link creations
To set up the field mapping for visit syncs, head over to the Salesforce: Spaces page in your Company Settings.
-
Under Value, type “DocSend Space creation” and click Add to confirm.
-
Then, under Field Mappings, set the Visit Property field equal to the appropriate Activity Field (from Salesforce), click Add, and repeat this for all custom fields:
Connect users’ DocSend accounts to Salesforce
At this point, the integration itself is configured, and all you need to do is ensure that your users connect their Salesforce accounts to DocSend. Since DocSend connects to Salesforce on the user level, each user will need to individually connect their account.
__
Still need help? See more articles in the DocSend Help Center.